Posts

A Splendid Event

Image
Splendid recently opened a store at The Grove and hired my pal and former Anthro colleague Kate Burger and her company k8vision to create all the displays for the event.  It was a huge project with many activity stands, including keychain making, sun prints, and even a flipbook station! (There was a lemonade stand, too, but I'm pretty sure we didn't craft any lemons...yet :)!).  Needless to say, Kate needed some help, so she called me (and a few other former Anthro gals) in for backup.  It was a good excuse to get out of the house and use my skills of yore a little bit!  Sometimes, being a mom makes me feel like I am totally out of the loop with all my crafting.  Juggling life with the babies with my craft is a tough balancing act, but I'd never want to pass up an opportunity like this...especially when my kids are part of the fun! Here's a good look at a great day, and a bit of the hard work that went into it... Colorful striped and patterned boxes used fo...

Easter Egg Crafts

Image
Easter is right around the corner.  That means it's time to break out the eggs...and start crafting.  I just happened to have a big bag of styrofoam eggs in the garage (who doesn't?!) so, in an attempt to de-clutter, my neighbor Jessica and I had an egg decorating party.  These are two of my creations.... Faux chocolate egg with felted center and white chocolate bunny molded from brown toy bunny. Gold leafed egg with original toy bunny in cove. Malted Eggs are pretty tasty. What you need: Styrofoam Egg Colored Aluminum from candy eggs Slim 1/8" ribbon for hanging egg Pin Earth Toned Model Magic White felting wool Felting needle Hot glue gun 1 inch deep cap and serrated knife Paint can cap for a large egg and smaller one for the smaller egg For the golden egg: All of the above except for felting wool and needle plus: 1/2 inch ribbon for border of peep hole, and to go around side of egg Gold leaf and sizing Lichen Blue craft paint and brush Direc...

Cherry Blossom Tapestry for UCLA Commons Window

Image
I found this swaying cherry blossom tree in a Tim Walker  book totally inspiring and wanted to recreate it for the UCLA Commons window. I knew it was going to take a lot of stamping so I took a cherry blossom stamp that I already had and stamped on a linoleum stamp then carved around the flowers to make a great big swath of cherry blossoms. I took a large piece of cotton muslin and dip dyed the bottom 1/3 into a warm salty bath of Rit dye Denim Blue.  I hung it to dry outside on a line.  After it dried, I appliqued the tree using three different bark-y colored fabrics cut into flame shapes.  As usual- Wonder-under was my friend, ironed to the back of the fabrics, they stuck really well to the muslin.   Next came the fun stamp-a-thon. I loosely mixed three different colors of Folk Art paint - Pure Orange, Metallic Rose, and Metallic Peach Pure. I hand-sewed a swing to the tapestry too to convey a camp-y feel.  It's pretty rad here on my picnic table, migh...

Rag Bowls

Image
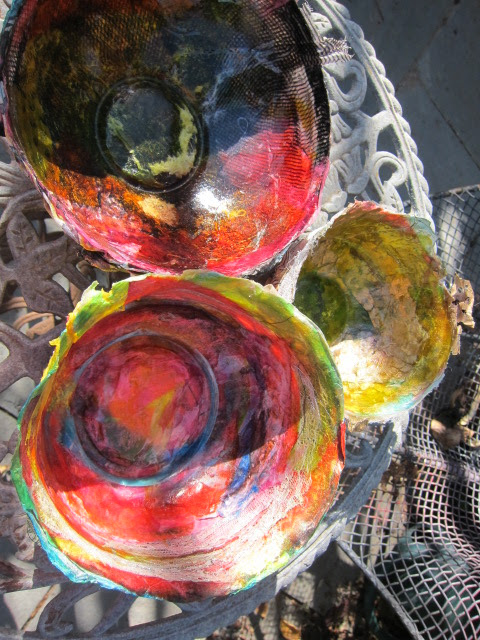
My students in my UCLA Family Commons class made these bowls out of tissue paper, lace, and various scrap fabrics. Dip shreds various materials measuring .5 inches x 2-3 inches long  into Mod Podge .   Overlap multiple layers (the more the thicker the final bowl) over a smooth surfaced bowl.  After a couple days, the new bowls just peeled off of the original ones!  Pretty and easy (although very messy!)  

San Diego Hat Co. Pennant Flags and Play Tent

Image
I made 31 flags total which ended up making a 35 foot long stretch. I made these projects for a San Diego Hat Company  catalog photo shoot.  The fabrics were mostly mens pj shirts from Goodwill that were cut up into triangles and patches for the tent.  If there was more turn-around time, I think I would have washed them, because honestly from the way they smelled, I think someone died in a couple of them.  Pattern for the pennant flags and 1/2 inch cotton bias tape I zig-zag stitched the top of the flags to every six inches.  The sides and top were turned under and zig-zag stitched. The tent was just one long piece of fabric backed by two different patterned fabrics.  I sewed patches to the outer piece of fabric- a natural cotton muslin that measured 6 yards.  The edges were turned over twice and straight stitched. My little star posing in a San Diego Hat.  He was such a good little model.

Merry Christmas Garland

Image
Want your house to scream Merry Christmas without running up the electricity bill or supergluing reindeer to the roof? Express yourself with these easy-to-make quilted holiday letters. In a few minutes you can add a festive touch to any mantle or, if you haven't got one (and, honestly, who has a mantle these days...?!), give that less-than-Noble Fir a voice by attaching some pom-poms and hanging these letters as ornaments on your Christmas tree. But don't stop at Christmas. This project's technique can be used anytime. Whether announcing a party or decorating a child's room, let your style speak with this easy to-do, and impossible to ignore, anytime garland.  Step 1:  Iron double-sided Wonder-Under  to quilted fabric. Step 2:  Iron parchment paper to the wrong-side of patterned fabric and trace 3 1/4 inch letters on the parchment paper.    Make sure the letters are backwards so the letter appear forward on the garland. Step 3:  Cut out lett...

Reinvent Christmas!

Image
If you have extra fabric and trim lying around, use it to wrap presents.  I hot glued the fabric to the boxes to make sure they didn't move about, but they could also be taped with strong double stick tape.  The fabric can be reused for all sorts of things. I'm not a great knitter but the woman who made this sweater from Goodwill was!  I took it and was able to make two big stockings from it just one sweater just by tracing a stocking I had and sewing up the sides.  There was also enough knit left to cover one of my holiday houses in the UCLA Commons Window.