Posts

Showing posts from 2011

Husky Christmas Trees

Image
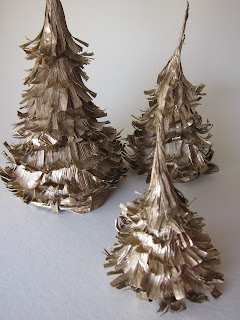
My friend Jessica and I have been doing some fun holiday crafts together.  She came up with the idea to use corn husks as trees- a brilliant plan since corn husks are available everywhere and are super inexpensive.  Jessica's are scalloped and pretty as you can see in the second photo.  All these Dr. Seuss books my 3 y.o. is having me read must really be getting to me, as I decided to make mine wild, bushy, and metallic. Wispy, piney, huskey Christmas trees. Jessica's sweet scalloped trees.  See directions at Hipster Teaparty . What You'll Need: Corn husks Kids party cone hats Hot glue gun Scissors Spray paint 1.  Disassemble and reassemble party hats to the shape/height of your liking.  I cut two down and heightened and narrowed one other.  Hot glue in place.  Glue a band of husk to the bottom of your hat to hide the bottom then cut a bunch of husks into 1 inch strips then notch every 1/4 inch.  Create a band at the bottom, curling outward, then work your way

Pop Up Frosty

Image
I recently got commissioned to create a 2-D snowman that looked like it would be at home in a pop-up book. For those looking for an alternative to Frosty's uniform circles, this untraditional geometric snowman is super cute and really easy to make with 2 inch strips of cardboard. What You'll Need: A hole punch 3 ft x 6 ft piece of cardboard, I got my cardboard, and they cut it into 6 foot x 2 inch vertical strips against the grain at my local art supply store, Mittel's .   White paint and a small roller Foam sticky sheets in black and orange Scissors or a die cutter with the appropriate shapes- I used my Cuttlebug 2 9 inch plywood rounds 1 5/16 inch steel 3 foot rod 5/16 inch drill bit Drill Frosty waiting for his hat. Overlap two 9 inch circles, using a 5/16 inch drill bit, drill a hole in the center of the rounds then insert pole.  It should stay put on it's own. Take strips of cardboard and bend with the grain of the cardboard.  Start with a strip

Plaster Platypus

Image
My husband and I have a long running alliance with this very special, rare animal- we feel that if we were not humans, we would most certainly be platypuses.  This has led to many a-platypus in our lives: platypus t-shirts, platypus puppets, books, etc... So this year for my husband's birthday I decided to make an embodiment of our favorite creature to hang along side the real taxidermy we have in our house. What You'll Need: Wire Mesh- I used an old screen door screen Wire Cutters Newspaper and/or Newsprint Paper Mod Podge Sponge brush Gesso Plaster of Paris Paints and paintbrushes Drill and screws for mounting it 1.  Make the base structure with wire mesh. This is the back, I sewed it up with a loose wire. 2.  Decoupage over the mesh with strips of paper newsprint. 3.  Paint white with gesso- you can stop here after a few layers if you just want a papier-mache platypus and paint it the desired colors.  At this step, I thought that it looked a little

Stained Glass Animals

Image
Talk about a window to another world! With a simple picture book, plastic page protectors, and window paint, you can make your child's bedroom windows into a jungle, aquarium, and zoo all in one. Every time the sun shines, the animals come alive. This is kid-proof stained glass, and a great project for kids 2 and up. We've been working on Grippy's bedroom for a while and have gotten both windows covered almost entirely.  Grippy likes to make dots with the paint to make food for the animals to eat, so any time we have accidents, spills, etc., we call it food. This way, no paint ever goes to waste. What You'll Need: Gallery glass by Plaid or Klutz Squirt on peel off Window Paint Plastic page protectors- any thick plastic will do Toothpick A picture book with animals in it, any children's picture book will do Paper towel Noah's Arc on the window. We use an illustrated animal encyclopedia that we got second hand.  Love this book and it is a great

How to Make Big Bear Eyes

Image
Obviously, this project applies to everyone. I mean, on any given day who doesn't  have to take a fairly sketchy bear costume with inch-wide pinhole eyes and open them up so the average person over 3 feet tall can see through them to distribute flyers to an unsuspecting public? That's what I call art. With that in mind, here's how you make a stuffy costume bearable without having to hire an actual bear (they'd be offended, I'm pretty sure...bears don't like t-shirts): I drew bigger eyes. Cut the fabric. Used a thin blade hand saw to saw away the extra foam.   I had my 2 year old help.  I don't recommend this.  We made a big mess of the kitchen.   Note to self: do this outside next time. For the bigger eyes, I used cheese containers, mesh fabric and duct tape. Then duct taped the insides of the eyes so the foam pellets would stay put and folded the fabric under. Oh yes, cut out the bottom. Insert the container into the holes. Hot glue a

A Splendid Event

Image
Splendid recently opened a store at The Grove and hired my pal and former Anthro colleague Kate Burger and her company k8vision to create all the displays for the event.  It was a huge project with many activity stands, including keychain making, sun prints, and even a flipbook station! (There was a lemonade stand, too, but I'm pretty sure we didn't craft any lemons...yet :)!).  Needless to say, Kate needed some help, so she called me (and a few other former Anthro gals) in for backup.  It was a good excuse to get out of the house and use my skills of yore a little bit!  Sometimes, being a mom makes me feel like I am totally out of the loop with all my crafting.  Juggling life with the babies with my craft is a tough balancing act, but I'd never want to pass up an opportunity like this...especially when my kids are part of the fun! Here's a good look at a great day, and a bit of the hard work that went into it... Colorful striped and patterned boxes used for storag