Posts

Showing posts from 2009

Paperback Star Ornament

Image
This is a simple ornament made out of 8 sheets of a paperback novel fan-pleated, cut at an angle, then glued back to back with white glue.  A piece of twine was added to hang the star.

Golden Star Tree Topper

Image
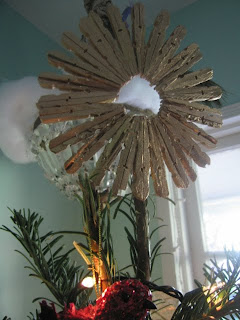
Top your tree with this glistening golden burst of... clothespins! What You Need: Pack of Clothespins from the .99 cents store Hot glue gun Plastic candy cane container or other 1 inch tube with one closed end. Gold spray paint Scissors to cut bottom 3.5 inches off of candy cane or tube. Directions: Undo clothes pins and glue each pair back to back. Glue approximately 30 pairs together.  They will naturally form a round. 3.  Cut the bottom 3.5 inches of your plastic candy cane off with scissors and glue to the back of the star. 4.  Spray paint gold or leave au natural.  I tried gold leafing it but I think the spray paint is easier and gives it a more even coat.

Bird House Ornament

Image
Making a birdhouse for a this cute bird is a great way to reuse a clean yogurt cup and some scrap fabric and decorate your tree all at once. What You Need: A plastic yogurt cup A small piece of cardboard for the base Hot glue gun A little bird- adopted at the craft store Loose bark- this is from a eucalyptus tree in our front yard that sheds bark but birch will do for those in colder climates Scissors Scrap fabric Cord Hole punch or awl (to make the hole where you hang the loop from). Directions: Cut hole in yogurt cup that looks like a doorway so the bird can sit there. Glue a little bark to the inside of the cup where you see into the doorway. Glue bark to the outside of the cup covering the entire cup and the cardboard base.   Poke a hole in the top of the bark and run a piece of string doubled through the hole and make a knot inside underneath the hole. Attach a few scraggly pieces of scrap fabric to the inside floor of the doorway. Glue the bird inside th

UCLA Family Commons and Taxidermy Geese

Image
I have been a very bad girl and have totally neglected my blogging duties as of late.  It's not because there is nothing to write about.  On the contrary, I have been doing some very exciting things and have even acquired a taxidermy Canadian goose that we call Ivan.  He is wearing a sweater that I made out of another old sweater that was worn thin and a popped collar completes the look.  He was a present from Valentino's jean designer.  They closed their showroom and had to get rid of everything.  As I was helping a gorgeous Italian woman try on dresses at C ynthia Vincent's Sample sale taxidermy came up and she happened to have been given the task of getting rid of two taxidermy Canadian Geese.  So, Cynthia happens to love taxidermy as much as I do so I got two- one for each of us.  She named hers Vivian.  She is such a genuinely nice person and donated tons of fabric scraps to my eco-wrapping workshop at the new UCLA Family Wellness Center on 2nd Street.  If you are in

Eyecandy from the Red, Aqua & Pink group

Image
Eyecandy from the Red, Aqua & Pink group Originally uploaded by Jennifer @ LilMissCupcake Yummy colors and awesome designs make me think that pink, aqua, and red mixed in with some creams are the way I am going to go with my holiday gift making.

House Mannequins

Image
Recently I've been working quite a bit with  Annette Tatum of House, Inc.   Her new book "The Well Dressed Home" was just released and for the launch she had me come up with mannequins to reflect themes in the book.  Here are pictures of romantic, eco, resort, and vintage.  I wish work could always be this much fun!

Fabric Headband

Image
A simple project perfect for a holiday gift.  I made this one for Annette Tatum with lovely fabric from her House, Inc. line.  Any simple cotton broadcloth or shantung silk will do. It's important that the fabric not be too thick or else it will really bunch up around the curved bottom tips of the headband or too fine or else the texture of the batting will show through so no silk scarves for this one unless there is a thin cotton lining underneath. What you need: Batting from a jewelry box Hot glue gun A wide plastic headband A quarter yard fabric Felt in complimenting color Scissors Step 1- Cut the bating and cover  the headband. Step 2-  Make a line of hot glue at the edge of the headband and glue fabric a 1/4 inch in trimming closely to the shape of the headband. Step 3-  Line the inside of the headband with felt cut 1/8 inch smaller than the inside of the headband.

Quick Sweater Sleeve Kitten Hat for Ideal Bite

Image
This is a quick and easy way to make a kitten hat out of an old sweater sleeve that I came up with for Ideal Bite 's Mama Bite column .  For photos of each step go to my Flickr page .   Any soft, light weight knit will do and it is a great way to recycle that sweater that has too many moth holes to wear anymore.   What You Need: The bottom 10 inches of an adult sweater sleeve (a soft, breathable knit works best) Matching thread and a needle 2 little felt triangles Embroidery thread to match the felt (optional; the regular thread works OK too) Scissors Directions: Cut off the bottom 10 inches of your sweater's sleeve. Lay it flat with the sweater's original seam on one side, and sew either the cut end or the cuff end closed, depending on which edge you want to be the the top. Sew it inside out if you want to hide the seam or let the seam show as decoration. It'll look like a rectangle with one edge closed. To make the ears, sew pink felt triangles to each

Aquarium Halloween Costume

Image
This was a really easy costume to make and only took 1/2 an hour.  Chris' costume is a muscle shirt from Venice beach with holes poked for Grippy's arms and a length-wise slit for his head from the neckline. What You'll Need: 1/2 yard 60 inch blue vinyl (this piece was $3.00 downtown L.A.) a 55" hoop of some sort- I made this one out of copper fridge tubing and duct-taped it the seam Florescent yellow duct tape Wax paper Clear packing tape Safe-T-Shapes for the shower floor in fish designs Glitter Bubble wrap Glue stick Scissors Fabric to make straps out of Some aquarium figurines- I had a diver and a treasure chest Optional- battery operated book light Directions: 1.  Cut a hoop for yourself out of tubing.  Duct tape it and round out the circle. 2.  Fold vinyl in half width-wise.  On one half, place fish stickers all over and use glue stick to stick paper backings on the vinyl as well- double the fish! 3.  Stick a foot and a half of florescent

Fantastic Mr. Fox Costume on Fox Searchlight

Image
Check out the Fox Searchlight page with my Fantastic Mr. Fox costume and the three other characters in the movie that won the contest!  The film-makers made mine a little crooked but it's still a super-cute video.

Swap-O-Ramarama

Image
Revamped T Originally uploaded by sonyanimri This year's Swap-O-Ramarama at Venice's Center for Peace and Justice was amazing!  The cool feature about the Swap-O-Rama which other swaps don't have are the booths with awesome designers helping with makeovers.   KB Vanhorn from Kokolelo had these amazing stencils that she designed.  I used her anchor on my Lacoste and one of her tree stencils for this off-white shirt.   Stephanie Girard of Sweater Surgery had a booth with adorable Hello Kitty, Tree, and letter die cuts.  One of them were cute as a button birds so those had to perch in my tree!  

Fantastic Mr. Fox Costume How-To

Image
finishedfoxmask Originally uploaded by sonyanimri Wes Anderson  , the incredibly talented director of such notable movies such as Rushmore, and The Royal Tennenbaums is coming out with his claymation adaptation of Roald Dahl's "The Fantastic Mr. Fox" over Thanksgiving weekend.  Gen Art and Fox Films co-sponsored a how-to costume competition that I just had to enter.  Gripps had the flu and needed to be held 24/7 so I was literally working on my costume 10 minutes a day for a couple of weeks.  I couldn't believe it when I got the call last week that I actually won for the "Mr. Fox" costume how-to!  Yipee!  My costume uses the simplest of materials and cost less than $7.00 to actually construct which helped it stand out.  Anyone could make this out of stuff lying around the house- I did! What You’ll Need: Fox Head: ·        Brown paper grocery store bag ·        Stapler ·        Scissors ·        Foxy red acrylic paint

Patchwork Anne of Green Gables Dress

Image
Back to work finally after a LONG break from having baby Gripps.  Currently working on a really fun project creating mannequins for Annette Tatum of House Inc.  This one is for the Quilt show coming up this week.  They are all the fabrics in her new collection made into a patchwork dress with some vintage accoutrements.  I would love to sip a nice cool lemonade on a midwestern porch swing in this!

Halloween Costume Ideas

Image
I used to be a regular on this magazine show called Soaptalk on the Soapnetwork presenting fun and easy last minute Halloween Costumes .  The costumes were wild and over the top yet all of them had the common element of being fairly easy to construct.  Here are some vintage videos to get inspired by: http://sonyastyle.com/sections/wear/Halloween_Costumes_DIY

Crocheted Acorn Earrings

Image
It's acorn season so I can't help but post yet another acorn project.  Go grab yourself some before the squirrels get to them first!  As for the beads, you don't have to actually know how to crochet to make these earrings, simply find crocheted beads at the bead store or buy these adorable Artistrywear beads   online.  Other fiber beads would work too- say felted beads would look amazing since having fiber, metal, and wood in one project is just so harmonious. What You'll Need: 2 Acorn caps 2 Crocheted beads (mine are Plaid Artistrywear Beads ) 2 gold bead caps 2 earring hooks 2 flat headed head pins Hot glue gun G-S Hypo Cement Jewelry Glue  or Superglue Round-nose pliers Wire cutters Little bowl of rice or beans Directions: Drop a small dab of hot glue into each acorn cap. Press crocheted bead lightly into cap, hole side up- making sure the glue does not ooze out of sides.  Hold in place for a few seconds. Put head pin through gold end cap an

Quick and Easy Vintage Sari Rag Bracelet

Image
A simple project that I made with an Indian vintage silk skirt that had shredded to pieces.  Any fabric will do but keep in mind that thicker fabrics will make thicker rope.  I find that a fine silk or satin crepe is ideal for this project because it shrinks up so easily when twisted for a soft, pliable, rope.  This project also looks great with two thick pieces of yarn.  A bike handlebar streamer instructional using the same technique coming soon! What You'll Need: Two 34"x 2" strips of silk or one double the length (longer if your wrist is a little chunkier) A safety pin Needle and thread Bead with big hole Directions: Tie the fabric pieces together at one end in a half-knot.  Just above the knot, pin the strips to your work surface. Pick up the two pieces of fabric and twist them clockwise.  Continue twisting until the fabric is twisted so tightly that it begins to kink. Twist the two fabric pieces together counter clockwise.  Continue until they are tig

Acorn Pin Cusion

Image
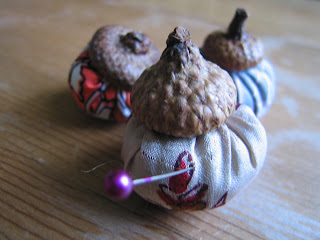
Fall is in the air and I found some sweet little acorns while on a walk in the woods in Dover, a charming town right outside of Boston.  The caps seemed to come right off so I thought that they would make a cute pin cushion cap.  These would also make great place markers for a dinner party with embroidered or even written names either attached to the acorns or sewn into the fabric. What You'll Need: Circle to trace, I used a jam jar lid Some yarn or cotton balls for stuffing Scissors and pen Scrap fabric  Acorn caps Glue gun Needle and thread Directions: Trace a circle on your fabric, cut it out. Fill the center with stuffing. Sew the edges of the circle and cinch. Put a dab of hot glue inside the acorn cap and press the sewn edges of the fabric into the cap.